Every expert was once a beginner. The key is to simply take that first step. This beginner guide to creating an Azure virtual machine aims to simplify the process, empowering newbies to start their adventure into the world of virtualization.
Whether you're a curious enthusiast, an aspiring techie, or a business owner looking to increase the performance of your infrastructure, understanding how to create a virtual machine and manage it will undoubtedly come in handy.
Please follow the steps below to create your first virtual machine.
OVERVIEW
Sign In To Azure Portal
Create Your Virtual Machine
Connect To Your Virtual Machine
Install IIS (Internet Information Service)Web Server
Open Power Shell On Windows Virtual Machine
View The IIS (Internet Information Service) Web Server Page
Tidy Up Your Resources
SIGN IN TO AZURE PORTAL
As a prerequisite, If you don't have an Azure subscription, log in here to create a free account before we get started.
Now that you have created your Azure subscription, sign in to the Azure portal using your mail and password to get started.
CREATE YOUR VIRTUAL MACHINE
a. In the search bar, type "Virtual Machine"
b. From the search results, select "Virtual Machine" from the list of resources shown
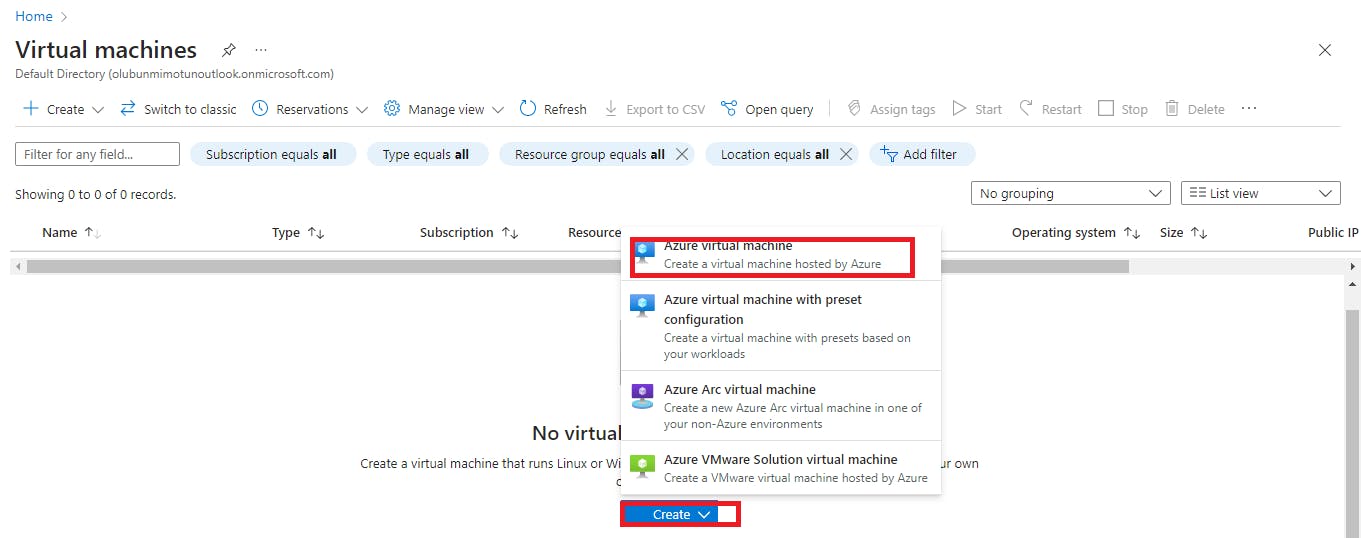
c. Click on the "Create" button
d.) Select the virtual machine highlighted

e.) You will be directed to the "Basics" page.
f.) Select your subscription and your existing resource group.

f.) Provide a unique name for your virtual machine.
g.) Select the region where you want your virtual machine to be located.
h.) In the image section, select the windows server 2022 Datacenter: Azure Edition-x64 Gen2 (free service eligible)
I.) Leave the remaining details as default.

j.) Select your desired size or click on "see all sizes" to have more options to choose from depending on your workload.

K.) In the administrator account section, provide a username and password.

L.) In the inbound port rules section, select "Allow selected ports" and then select RDP (3389) and HTTP (80) from the drop-down.
M.) Click on "Next: Disks>" to direct you to the Disk page

N.) On the Disk page click on the OS disk type dropdown and select Standard SSD or any disk type of your choosing as shown below. Leave the other columns as default.
O.) Click on "Next: Networking>" to direct you to the networking page.

P.) Leave the networking setting in its default state.

Q.) Go to the management page and scroll down to "Auto shutdown" and enable it to automatically shut down your virtual machine at a specific time. Ensure your time zone is accurately selected.

R(i) Leave the monitoring, advanced and tag pages in their default state and click on "review+create" at the upper-right corner of the page.

R(ii) Or the "Review+create" button at the lower-left corner of the page.

S.) Review the summary of your virtual machine configuration and click on the "Create" button to begin the deployment process.

T.) Wait for Azure to deploy and provision your virtual machine. This process may take a few minutes.

U.) Once the deployment is complete, click on "Go to resource".

CONNECT TO YOUR VIRTUAL MACHINE
Create a remote desktop connection to the virtual machine. These directions tell you how to connect to your VM from a Windows computer. On a Mac, you need an RDP client to connect.
a) On the overview page of your virtual machine click connect

b) Connect with RDP, leave the default settings and click the download RDP file to your file

c) Open the downloaded RDP file and click "connect"

d) Input your username and password

e) Click yes to the prompt

f)You are logged into your Windows Server Manager

INSTALL IIS (INTERNET INFORMATION SERVICE)WEB SERVER
a) On the upper-right corner of the server manager page, click " Manage" to Install the web server.

b)Select "Add Roles and Features". Click Next and follow the instructions to install the server

c)Once installation is successful, you can see the IIS Icon on the upper-left corner of the server manager dashboard

Open Power-Shell on Windows VM
a) The next step is to search for PowerShell on the Windows VM, run the following command and press enter:
Install-WindowsFeature -name Web-Server - IncludeManagementTools
b)Once you press enter, you will get the command in the red box below which shows the installation was successful.
c) Thereafter, close the RDP connection to the VM.

View the IIS (Internet Information Service) Web Server Page
a) Go back to the Virtual Machine on the Azure portal,
b) In the VM overview, hover over the Public IP address to show Copy to clipboard. Copy the Public IP address and paste it into a browser tab.

c)The default IIS welcome page will open, and should look like this:

Tidy Up Your Resources
Once you've achieved the aim with which the VM was set up, you can delete the resource group, virtual machine, and all related resources to avoid unwanted charges.
a) At the top of the page for the resource group, select Delete resource group.

b) A page will open warning you that you are about to delete resources. Copy the name of the resource group and enter to confirm the deletion. Select Delete to finish deleting the resources and the resource group.

C. Another way to ensure your VM with its resources has been properly deleted is to click the resources box before deleting the VM.


I hope this article helped in setting up your first virtual machine. Thank you
